In this article, I will explain how to store crypto assets and NFT.
How do you store crypto assets and NFT after you purchase them? In most cases, you probably keep your crypto assets in your exchange account, or in your “MetaMask” wallet for NFT purchased at OpenSea.
If you plan to sell them soon, that may be fine.But it’s not a good idea from a security standpoint to keep them there for a relatively long period of time.

There’s been an increase in NFT thefts lately!
Recent trends in NFT theft include direct messages from social networking accounts such as Twitter and Discord that lead to fraudulent websites, and the sending of NFT to OpenSea by strangers who then accept the offers received and later have their NFT extracted. The methods are becoming increasingly sophisticated.
Security is becoming a phase where it is particularly important to keep up to date with the latest information and improve your defences.
I will explain this issue with an introduction of a very secure wallet called “Ledger,” which is called a cold wallet.
Recently, it is also recommended to create multiple MetaMask wallets and use one wallet for purchases and another for storage. For more information on how to create a MetaMask wallet, please refer to this article.
What is Hot wallet and Cold wallet?
What does it really mean? The differences are as follows:
Hot wallet
- Connected to the Internet
- Manage crypto assets online
- Convenience compared to cold wallets
Cold wallet
- Not connected to the Internet
- Offline management of crypto assets
- Less convenient than hot wallets, but more secure
In summary, the difference is whether or not you are connected to the Internet. And the fact that both wallets are managed by “Recovery Phrase (private key)” is the same.
Hacking doesn’t go away 100% of the time
However, one must always keep in mind that being constantly connected to the Internet means the possibility of being hacked. Various wallet applications and exchange accounts are supposed to be more secure than before, but even so, it is impossible to say that they are 100% hack-proof.
If a virus is planted and the “recovery phrase (private key)” is extracted without your knowledge, all assets in that wallet will be lost. Hackers will expose security vulnerabilities and exploit blind spots. This trend will never go away 100% in the future.
What we need to consider is that if the safety is not 100%, then we must try to make that storage method as close to 100% as possible in terms of safety. In particular, the larger the amount of assets, the greater the need to do so.
Including MetaMask, keep only crypto assets that are scheduled to be traded in the near future in a hot wallet that is connected to the Internet, and store those that will not be used for a while in a cold wallet. This is common sense for safe storage of crypto assets.
About cold wallet 『Ledger Nano』
Cold wallets are also called “hardware wallets” because they use a dedicated device. The most common examples are “Ledger” and “TREZOR,” but here I will introduce “Ledger,” which I have actually used and which is more reliable.
There are two types of 『Ledger Nano』
There are two types of Ledger (formally known as Ledger nano): “Ledger Nano S Plus” and “Ledger Nano X“.
The differences are as follows:
- Ledger Nano S Plus:capacity (1.5MB), Bluetooth not supported
- Ledger Nano X:capacity (2MB), Bluetooth enabled
Ledger NanoS:Small capacity (138KB), no Bluetooth support
※ Ledger Nano S is no longer sold officially.
※ Please check the official or authorized distributor’s website for the latest information and details.
I’m currently using “Ledger Nano S”. The operation itself is simple and easy.
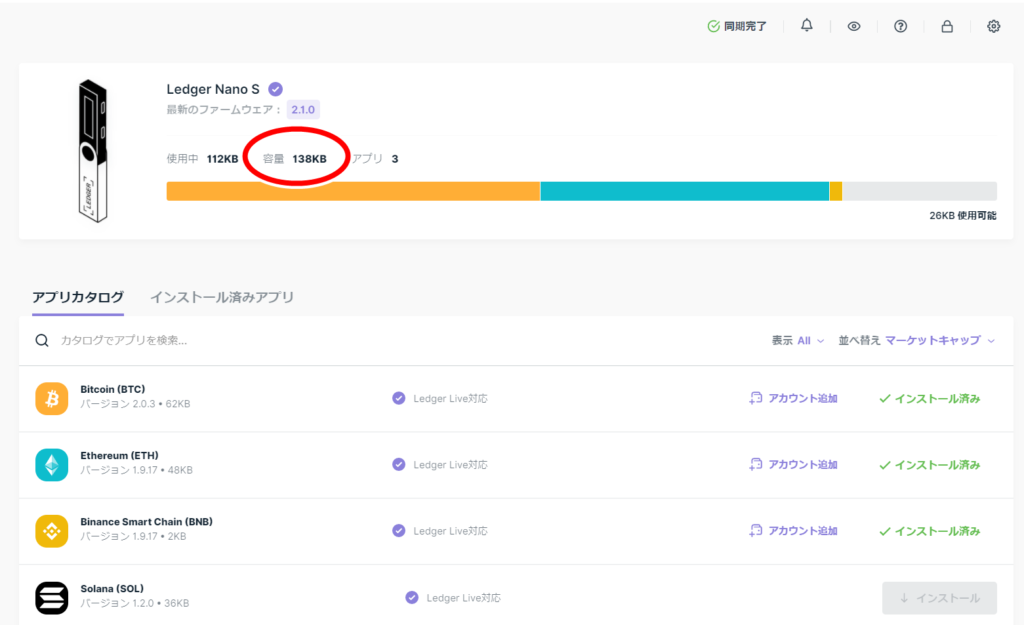
The image above is a screenshot of “Ledger Live,” which is operated on the PC side when using Ledger. As shown in the red circled area, there is 138KB of space, and three applications are installed here: “Bitcoin (62KB)”, “Ethereum (48KB)”, and “Binance Smart Chain (2KB)”. However, if you try to install other altcoin apps in addition to this one, you may cause a capacity overflow.
For example, if you try to install “Solana (36KB)” application here, it will be over capacity and cannot be installed. In such a case, you can use it while organizing the unused coin apps. This is because some coin apps, such as “Binance Smart Chain (2KB),” have a small capacity.
Therefore, it is recommended to try the inexpensive “Ledger Nano S” first to get a feel for it.
The “Ledger Nano S” is no longer sold at official stores or authorized distributors. Therefore, “Ledger Nano S Plus” is a good choice if you want to try it for the first time.
The “Ledger Nano S Plus” has significantly more storage capacity than the “Ledger Nano S,” so the number of apps that can be stored should increase and become easier to use.
However, if you have a lot of coins and already have plans to transfer them to a cold wallet, it is better to purchase the larger capacity “Ledger Nano X“.
Easy to purchase, as little as 3 minutes
About『Ledger Nano』setup
The following steps will help you start using the system smoothly.
- Transcribe the recovery phrase (private key)
- Set the recovery phrase (private key) to Ledger
- Set Pincode to Ledger
- Install “Ledger Live” to be operated on the PC side and connect to Ledger
- Install the coin app you want to store in “Ledger Live”
You can get started in roughly five steps. It’s very easy to set up, requiring only 15 to 20 minutes.
For the set-up, watch this YouTube video to get an idea.
Also, if the device fails for some reason, the stored crypto assets will not be lost due to the failure. If the “recovery phrase (private key)” set before starting to use the device is stored securely, it can be restored using that key.
How to store NFT (common to Ledger Nano series)
Transferring money from an exchange or MetaMask is no different from the normal money transfer procedure, as all you need to do is specify the destination address generated after installing each coin’s app on “Ledger Live”.
This section explains the actual procedure for sending NFT purchased on OpenSea to Ledger, so let’s go through it together.
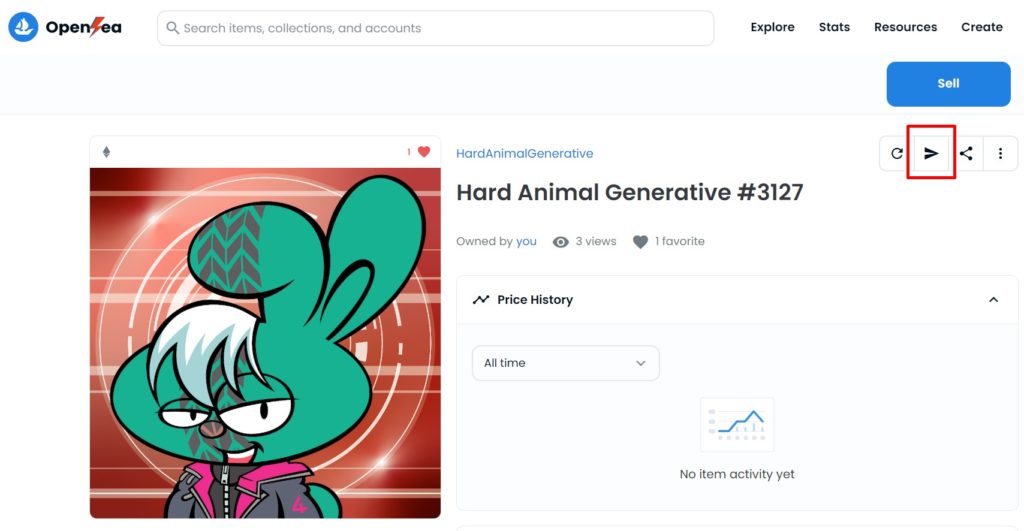
First of all, select the NFT you want to send from your OpenSea account and click on the paper plane symbol in the upper right-hand red box.
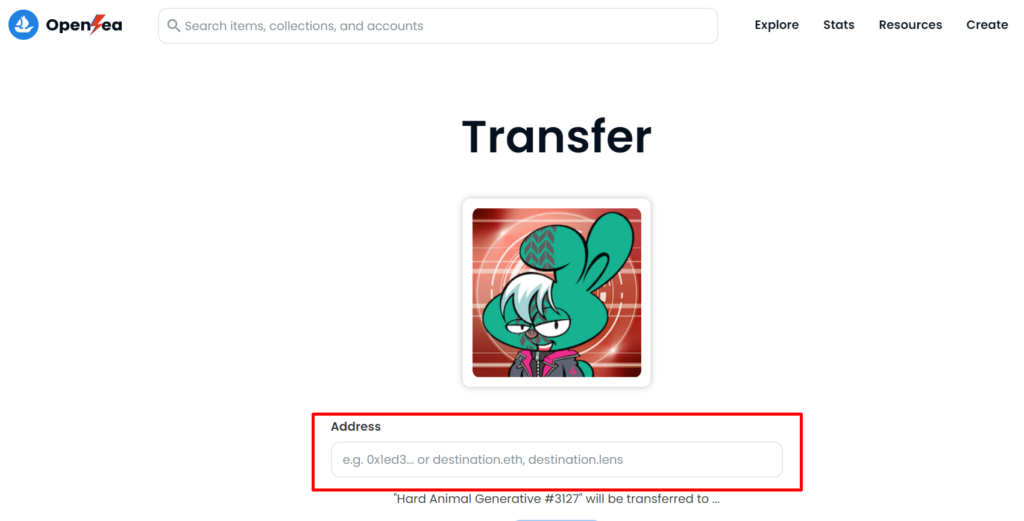
Next, the screen prepares for the transfer, and the Ledger ethereum address is entered in the red frame part address field.
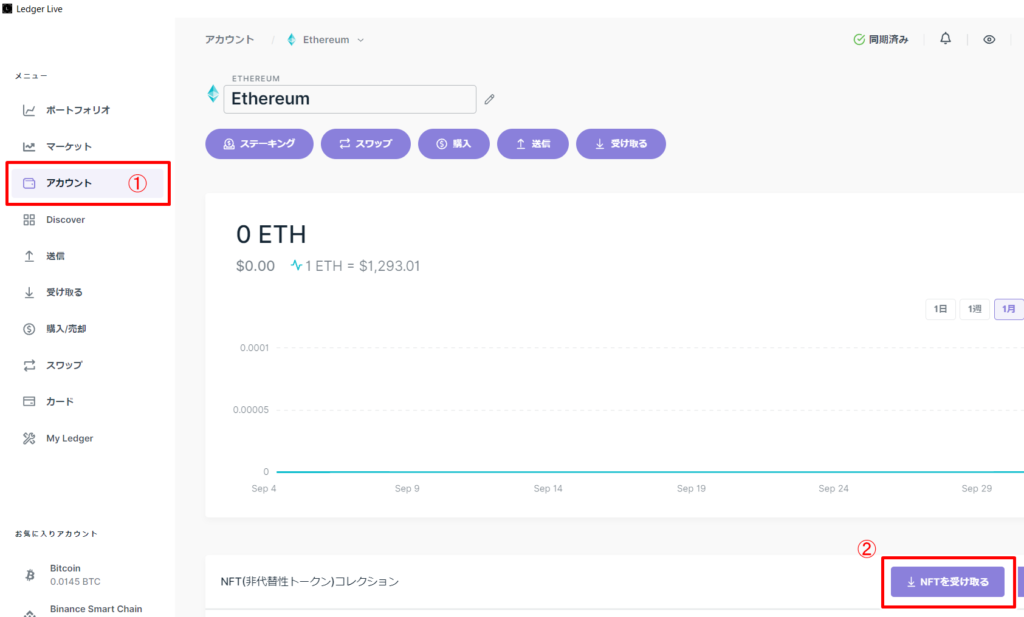
Return to ‘Ledger Live’ and click on your account in ① to see the list of installed coin apps. There, select the Ethereum app and you will see the screen in the screenshot above, then click on tab ②.
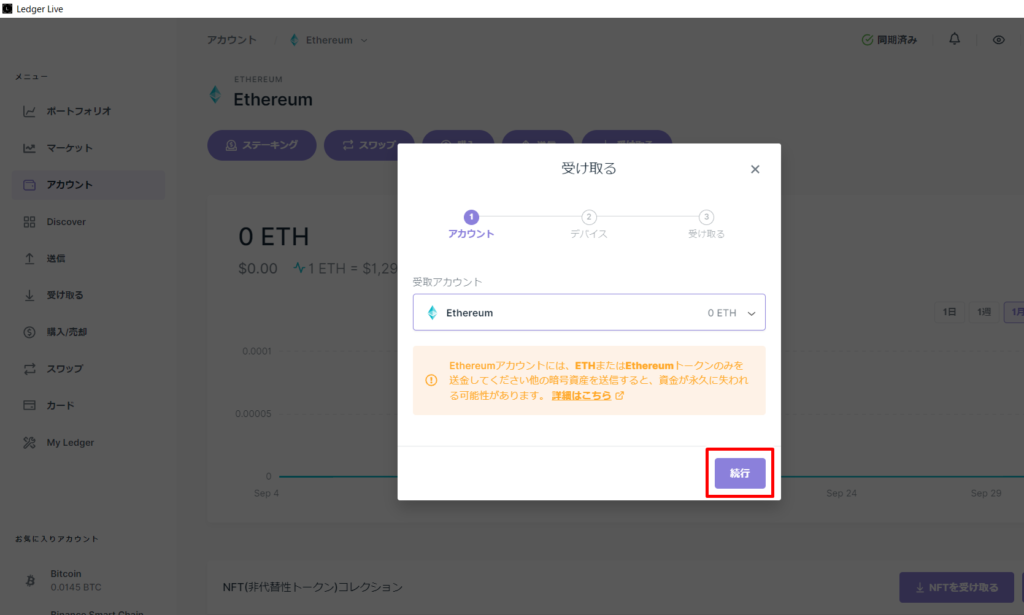
You will then be taken to the screenshot shown above. Click on the red framed area.
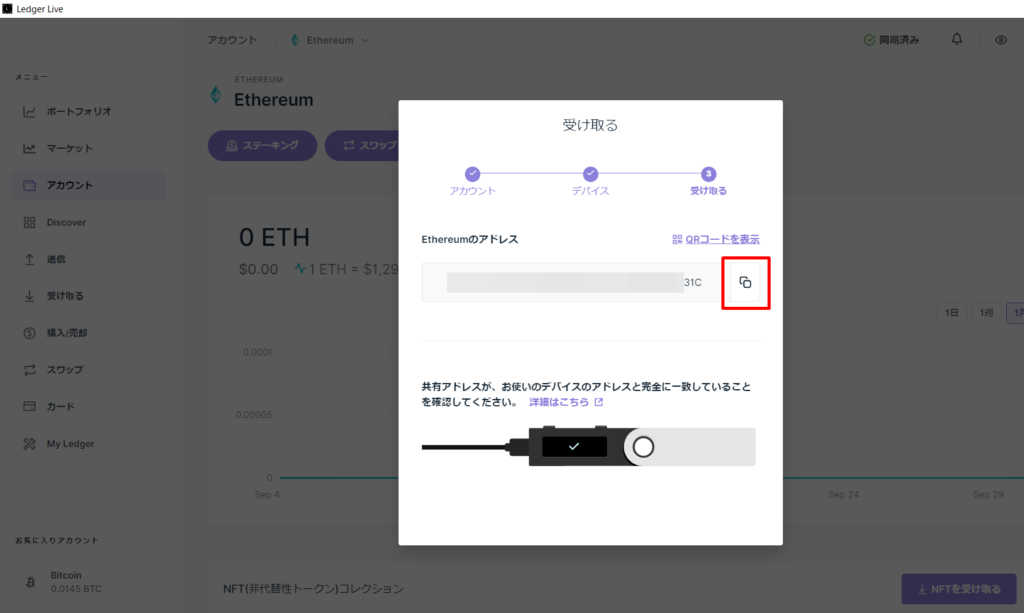
The ethereum address on the Ledger side is displayed, click on the symbol in the red frame area and copy the address.
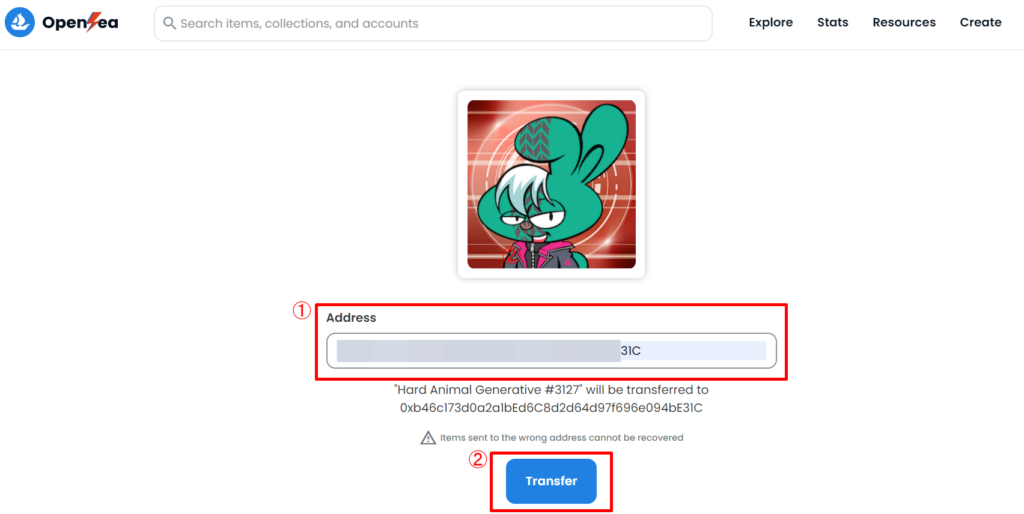
When you return to the OpenSea transfer preparation screen, enter the address you copied in ①. Recheck that the address you entered is correct and click ②.
Finally, check the gas bill in MetaMask and if there are no problems, approve the process and the procedure is complete.
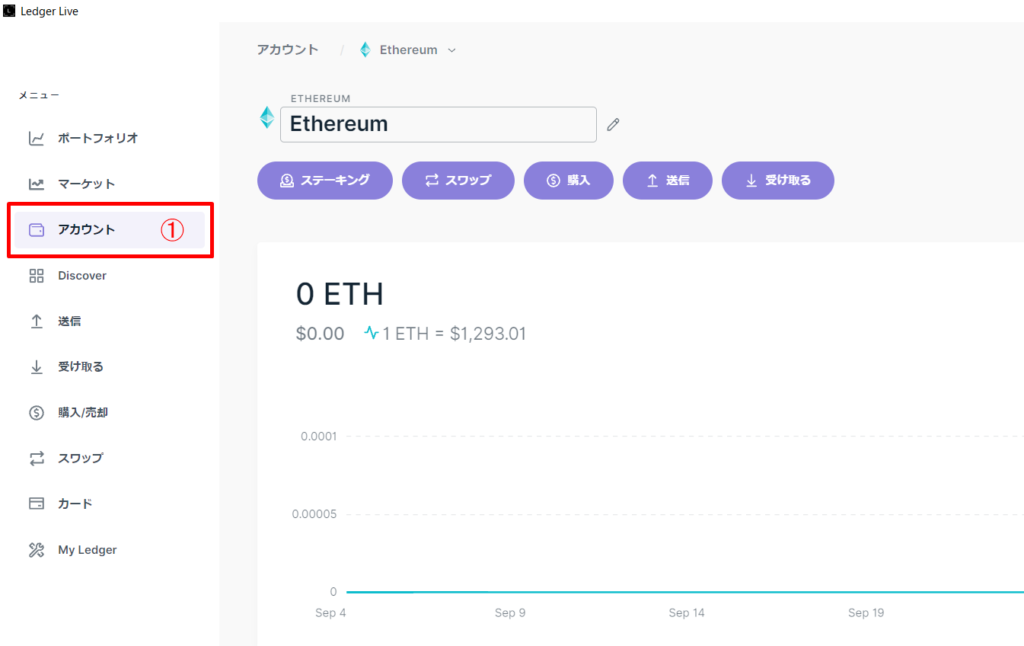
To check the completion of the transfer, please open your Ethereum account from the account selection in “Ledger Live” ① above and confirm the completion of the transfer.
How to send NFT (Ledger Nano S Series Special Edition)
Normally, sending NFT stored in a Ledger Nano (excluding the S series) to a “MetaMask” wallet can be done without difficulty by specifying the destination address from “Ledger Live” and approving the process.
However, if you are using the Ledger Nano S, you will get an error message from “Ledger Live” and will not be able to retrieve your NFT using the normal sending method.

If you’re using “Ledger Nano S”, there’s a trick to it!
This section explains how to send NFT when you are doing “Ledger Nano S”.
Please complete the following preparations in advance.
- Chrome is recommended for PC browsers
- Start “Ledger Live”, update to the latest version, and close the application
※ In some cases, using a browser other than chrome will result in failure.
With the Ledger Nano S connected to your PC, open the “MetaMask” wallet.
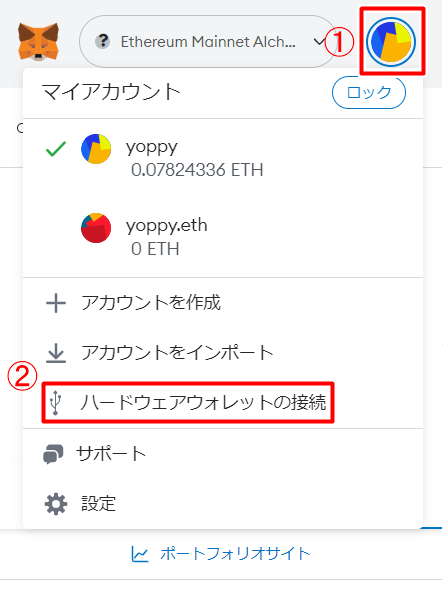
Click on the icon in the red frame above ①, and then select “Hardware Wallet Connection” in ②.

Select the wallet you wish to connect (in this case, Ledger) and have it recognized by the “MetaMask” wallet. When the connection is complete, “Ledger 1” will appear in your “My Account” section of the “MetaMask” wallet.
Next, access OpenSea while still in this “Ledger 1” account.
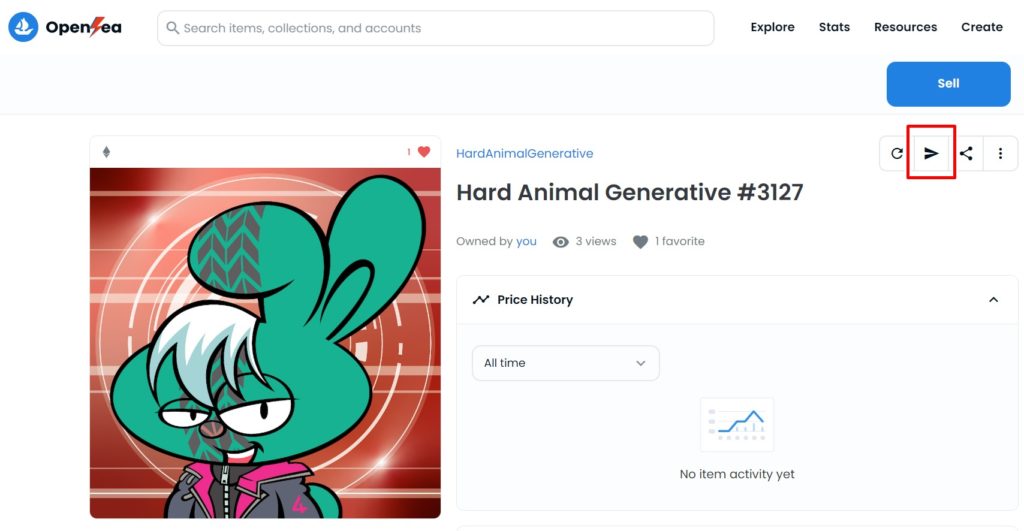
Then, the NFT stored in Ledger will be displayed. Please select the NFT you actually want to send, and then click the paper airplane symbol in the red frame above.
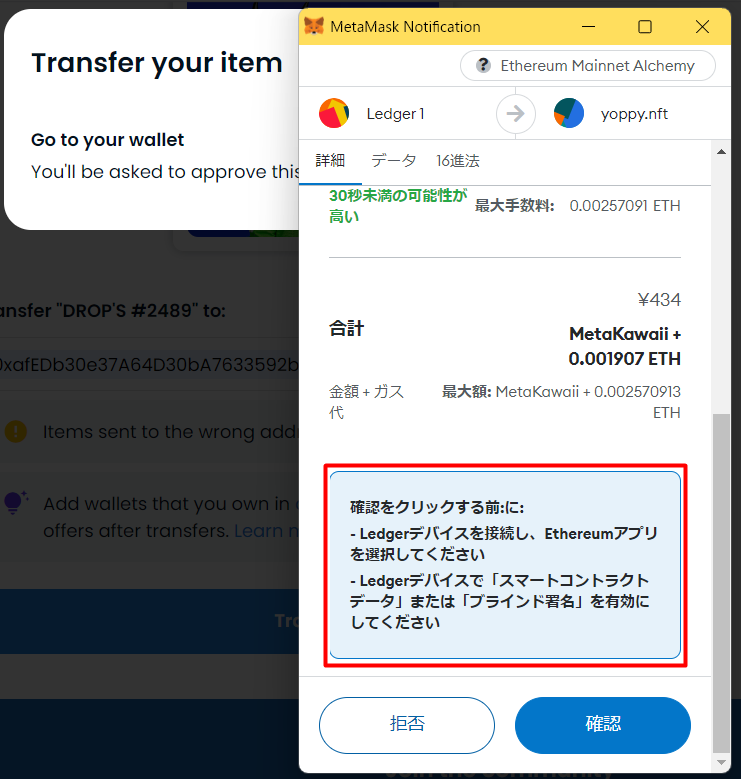
After specifying the destination address, the “MetaMask” wallet will return instructions as shown in the red frame above.
Go back to the Ledger device, change the settings to enable blind signing, and approve it to perform the NFT transfer.

Don’t forget to disable the blind signature back after the NFT has been successfully sent!
Easy to purchase, as little as 3 minutes
Summary of this issue
The storage methods explained so far are essential knowledge for the safe handling of crypto assets from now on.
If you actually use it, you will learn it quickly because the operation is simple and easy. In addition, there is no way to avoid using it considering that it guarantees safety, so please take this opportunity to give it a try.
Open an account with an exchange
A good exchange to recommend for trading crypto assets is “BYBIT“.
Secure with strong security(Open a Free Account)
There are multiple reasons for this, but it is largely due to the following three points.
- No transaction fees on all cash currencies ※ Starting from Sep 6 2022, 10 AM UTC
- No fees for sending to other exchanges
- Top class server strength and high security
As mentioned above, no transaction fees for buying, selling, sending and withdrawing money, the higher the volume of transactions, the more attractive the lower commissions become. In addition, the operability of the application is outstanding, so the point is that it can be easily operated even by beginners in particular.
It depends on what you value in terms of service, but if you want to keep fees and other costs as low as possible, “BYBIT” is an exchange that offers high performance services compared to others.
That’s all for this issue.
Thank you for reading this far.


コメント